After a heavy down pour or wash down, there would reliably be a puddle of water in the driver's foot well and in the upper dash parcel shelf. Clearly wanted to get to the bottom of this.
Removed the upper dash to get a better view as to where the water is getting in from. After investigation with a hose pipe, determined there were at least two points of failure.
Removed the upper dash to get a better view as to where the water is getting in from. After investigation with a hose pipe, determined there were at least two points of failure.
The first leak point identified was on the left hand side dash vent.
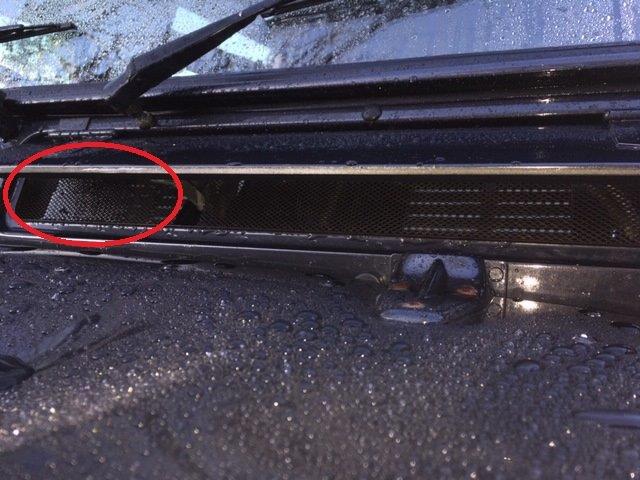
Perhaps a little difficult to see in this image. The right hand side of this vent was leaking.
The second leak point was on the bulk head around the brake and clutch housing.

Again perhaps a little difficult to see. There were two screw holes that the previous owner had made to secure the carpet. Unbelievable!
Time to fix the vent seals and fill the holes in the bulk head.
First step was to remove the vent panels. This involved removal of the securing nuts behind panel and tapping out the axle pins. Sprayed on some penetrating oil on the split pins and left over night.

Tools used were an 8mm spanner to remove the bolts, pliers to pinch the ends of the split pins and a large wooden dowel to tap with a hammer on the ends on the split pins to remove them.
Once the pins had been tapped a little, the pliers could then be used behind the head of the pins. Gentle tapping the pliers allowed the pins to come free.

Vent removed. Cleaned up the mesh screen and surrounding area. Lubricated the vent adjuster hinges which were now exposed.

Upon inspection of the left vent, it can be seen that the seal had been badly fitted. The kink lining up exactly with the leak point.

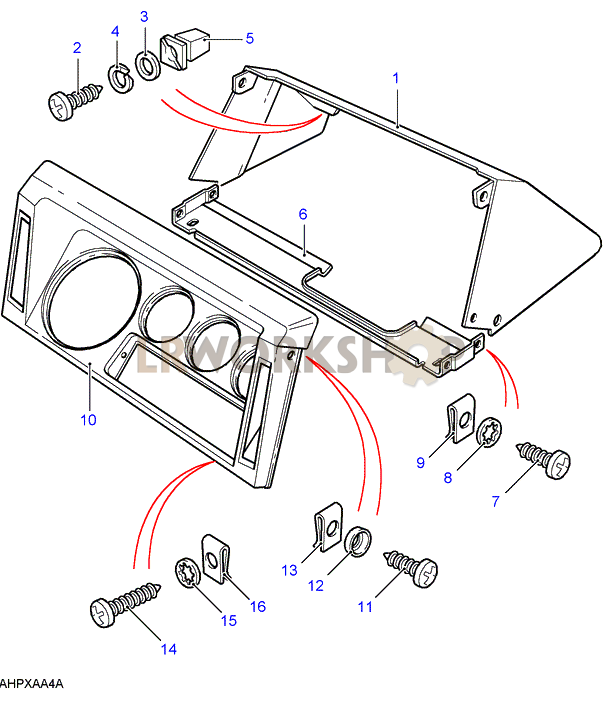
Ordered a pair of new seals for each vent - JAE000030 - Decided to replace both.

3 - Vent Seal - JAE000030
Also ordered replacement bolts, retaining washers and washers.
Removing the original seal left behind a really sticky dirty gunky mess. Not really a surface that is ideal for fitting a new seal. Tried all sorts of ways to remove the mess. However, ended up having to paint strip the vent panels - ouch!!!


After way too much time spent stripping, they come up really well.


Then spray up with two top coats and two lacquer coats:


The new seals and vents were fitted back on to Sluggie.
<IMAGE>
Next task was to address the leak in the bulkhead.
Decided best approach was to fit some nuts, bolts and penny washers with a bundle of sikaflex.

3 - Vent Seal - JAE000030
9 - 4 x SH105121L bolt
10 - 4 x WC105001L - washer
11 - 4 x WL105001L - retaining washer
11 - 4 x WL105001L - retaining washer
Also ordered replacement bolts, retaining washers and washers.
Removing the original seal left behind a really sticky dirty gunky mess. Not really a surface that is ideal for fitting a new seal. Tried all sorts of ways to remove the mess. However, ended up having to paint strip the vent panels - ouch!!!

Paint stripping

More paint stripping


Then began the process of spraying up again. Given was doing this over the winter period, took the plunge to spray up inside the house. First step, make a "spray booth". As you can imagine, Katie was thrilled.

So couple of coats of etch primer

Then spray up with two top coats and two lacquer coats:

And finally fitting of the new vent seals.

The new seals and vents were fitted back on to Sluggie.
<IMAGE>
Next task was to address the leak in the bulkhead.
Decided best approach was to fit some nuts, bolts and penny washers with a bundle of sikaflex.
Made an improvised nozzle to get into the hard to reach places behind clutch mounting bracket.

Here the nut/washer/bolt arrangement can be seen.
<IMAGE>
Once all had gone off, few days later did the hose pipe test again. Can happily report no more leaks!


<IMAGE>
Once all had gone off, few days later did the hose pipe test again. Can happily report no more leaks!
When taking the dash off, noticed that the heater control cables had some slight chaffing marks on them where they pass over the edge of the lower dash. No concerns with the integrity of the cable.

However, took a precaution of wrapping them up with a few turns of black gaffer tape.

Binnacle Enclosure
Noticed that there was a hair line crack in the right hand side of the binnacle enclosure. So while upper dash was out doing the water leak examination, replaced the binnacle with a new one.
1 x MTC2808 - Binnacle enclosure
No comments:
Post a Comment